Preparation for going out into nature abstract. Basics. Preparing for a hike


1. During the hike, you must follow the established diet and drinking regimen. 2. Even on a hot day, at a water temperature of at least 18 degrees, you can spend no more than 10 minutes in the water. 3 You can swim on the way every day, but you must follow the measure. 4. Follow the rules of hygiene. 5. Follow the rules of discipline.

6. Sunbathing during hiking should not be taken - it weakens the body. In hot weather, a cap should be worn on the head. 7. It is necessary to observe the mode and schedule of movement. 8. Before hiking, you need to check your personal equipment. 9. It is necessary to carefully prepare for any trip, even a simple one. 10. The study of the area must be carried out according to the topographic map of the area, it is also advisable to consult with tourists who have already been there.

Particular attention in preparing for the trip should be given to clothes and shoes. - Shoes should be comfortable, fit snugly on the leg, but not compress the foot. - Shoes should be aired daily and dried if necessary. - Clothing should be as light as possible and have a small volume. Outerwear should be waterproof, and underwear should absorb sweat well.

Bakulin Alexander Viktorovich, teacher-organizer of life safety
MBOU secondary school No. 14, Nevinnomyssk
Outline of the lesson “Preparation for going out into nature. Determination of the necessary equipment for the trip »
6th grade
Lesson Objectives:
educational :
. Introduce students to the necessary equipment needed for the trip.
Educational :
Contribute to the development of skills in organizing bivouac work. To develop the monologue speech of students. Continue to develop textbook skills.
Nurturing:
To educate students in accuracy, a sense of responsibility for their actions in an autonomous existence, the ability to listen and be heard.
Lesson type: learning new material with elements of practical work.
Required resources:
textbook A.T. Smirnov, B.O. Khrennikov "Fundamentals of Life Safety", paragraph 1.6 "Definition of the necessary equipment", handout: texts, poems, a selection of illustrations, multimedia equipment, preferably Internet access (or a cartoon recorded on a computer)
Two sets of equipment (backpack, foam, seat, tent, sleeping bag, first aid kit, ropes, carabiners, bowlers, bowl, spoon, mug, washing accessories, world maps, topographic map, compass, iron, tape recorder, hair dryer, smart and sports clothes and etc)
Rationale:
The 6th grade program provides a unique opportunity to acquire tourist skills, prepare for regional competitions, competitions and tourist gatherings, and make a choice in favor of a healthy lifestyle.
The lesson is conducted on the technology of Critical Thinking
Thanks to the technology of Critical Thinking, a health-saving space is created in the classroom, students are offered different forms of work, information is repeatedly repeated, students work together, which allows them to better assimilate the material.
The teacher is the organizer of the learning activities of students at all stages of the lesson.
The organization of the information and educational environment through the use of modern training tools and technologies, multiplied by constant monitoring of the quality of the acquired competencies, will allowstudents to learn. Students gradually learn the basic methods of educational cognitive activity, learn to work independently with various sources of information.
The ability to self-organization, self-regulation and reflection is formed.
DURING THE CLASSES
Organizing time.
Call phase
Checking homework
(on the desk according to a copy of the poem)
You are the editor of a children's magazine, summer is coming, holidays ...
Reading a poem is an individual work.
If you are going on a hike,
What will you take with you, friend?
This needs to be figured out
Maybe a climbing hook?
So that any two nodes
Connected cleverly,
The whole team would take
Strong Ropes.
To sing songs together
Bards-tare-bars,
It is very important to take…
That's right, guitars.
You also need to take money
Like fit.
Diary to be
The memory of the trip.
In order not to fidget on the stones,
Among the fat pines,
You bungled from the rug
Yorzalnik-podshtuchnik.
In the fight against hunger always
Banks are helping
And condensed milk, and caviar, and peas in a Tin.
Take matches for the fire,
Can lighter,
And a needle and thread
Things are also pathetic.
Take iodine and a mug too
Spoon, bowl
On a long journey
Don't forget to take it with you
We'll take shoes, friends,
The sole is smooth.
What can't you go without?
That's right, no tent.
And without a backpack,
Sleeping bag, of course.
And without an ax,
We need him forever.
Need a Fishing Rod, Lantern,
Bread for the road
Cellophane to take, as of old,
Help from the rain.
Cast iron to make tea
cold hat,
Brush, paste and shampoo -
We will wash too.
Take the train
Also the schedule
Not to spend hours
Gift in anticipation.
So as not to get lost along the way,
Do not fall behind the group suddenly
The compass will definitely come in handy.
Know which is north and which is south.
Well, I guess they've got it all.
Have a good trip, friends!
I just want to be taken
What mistakes will you fix?
Frontal work - each couple expresses their opinion.
2 phase - aboutmeaning.
Teacher: So, we have a mountain of things in front of us, now we just have to put them down and go ...
How to do this will be shown to us by familiar cartoon characters.
"Spasik and his friends" Rules for safe behavior in nature " (Video clip in a folder ). Please be very careful while watching.
And now it's time for us to start packing our backpacks.
Equipment for the task - camping equipment (if not, it is possible to use an interactive whiteboard or cards)
Two future tourists go out and lay out on different tables
A. equipment for the group
b. personal equipment
On the table where the equipment lay, they leave things that are not needed for the trip ...
(sometimes there are a lot of them, sometimes not a single one: children even collect an iron for a hike)
Frontal work: what mistakes did you make?
Every year, when I go on a tour, on the platform I have to repack the things of tourists, especially beginners, why do you think?
Answer options - you can fix on the board in the form of a cluster, you can listen orally in order to save time in the lesson.
Individual work. Reading text.
Sample text and diagrams for individual work:
Proper packing of the backpack.
The most important thing when packing a backpack is not to take too much! As a general rule, a person of average build should not carry more than 20-25% of their weight on long hikes. The center of gravity of the backpack should be closer to the body, and ideally at shoulder height. In this case, it will be located above the center of gravity of the body and will not pull back. How to properly load a backpack of large volumes (from 30 liters) is described below:
Place your sleeping bag, down gear and other light items in the bottom compartment of the backpack. Place heavier items such as clothes up and out. Heavy equipment - a tent, food, heavy jackets - above shoulder level, closer to the back.
Put small, frequently used items in the pocket on the lid of the backpack for easy access.
In order to increase the streamlining of the backpack, to reduce the surface of exposure to wind and moisture, one should try to place all things inside the backpack as tightly as possible, and leave as little as possible attached to the straps on the outside.
Keep the weight evenly distributed, especially in the side pockets.
Use compression bags to keep things organized and reduce bulk. It is also recommended to use hermetic bags for things that are especially sensitive to moisture (for example, for a sleeping bag).
Important! If the backpack strongly pulls back, this indicates that the center of gravity of the backpack is located very far from the center of gravity of the body. When you carry a heavy backpack, this state of affairs makes the hike a torture. The backpack puts a lot of pressure on the shoulders and generally places an uneven load on the entire body. If your backpack is not properly stowed, it can be risky and dangerous on difficult routes. In light hiking conditions In light terrain (easy routes, e.g. hilly terrain), the center of gravity should be higher.
In difficult conditions
On difficult routes (climbing), the center of gravity of the backpack should be slightly lower and closer to the center of gravity of the body. This packing of the backpack contributes to a slight forward lean and, in general, more stability and balance compared to a higher center of gravity.
Teacher:
Great, now you know the rules and can show your skills!
-It is necessary to properly pack things in a backpack (personal and group equipment has already been prepared on different tables by previous students), but not only packing, but also correcting previous mistakes.
Teacher: There is little time for packing, we work quickly, by the way, mom does not help, she was urgently called to work!
At the start, attention (5 -6 minutes)
(as a result, the backpack should be assembled)
Usachov A.
Ivan Petushkov was going on a campaign.
I took a compass, a tent and a Voskhod razor.
I stuffed my backpack with stew and millet,
I took a fishing rod, hooks, a lantern and a hammock,
Binoculars and a mosquito net
And a bag of birch firewood.
On the belt - a mug, an ax, a bowler hat,
Under the arm - a pillow and a sleeping bag.
A gun with an alpenstock, of course, in hand.
And Kettle-So-Whistle - in the teeth.
On the road, tourists! -
Ivan exclaimed.
And Kettle-With-Whistle
Fell under the sofa.
He picked it up
But the kettle fell
And right there in the outlet
Got alpenstock...
Ivan trembled
Like grass in the wind
Swayed, sneezed -
And scattered the wood.
And suddenly hooked on the chandelier
And fell to the floor with a backpack.
Ivan Petushkov groaned and groaned.
Ivan screamed...
But he did not raise himself.
Since then, going on a hike with friends,
Petushkov never takes himself!
3 phase - reflection phase
In this phase, individual creative work is carried out.
For example:
1. Make a memo for a novice tourist (if there is not enough time in the lesson, this work can be an interesting homework).
2. You can use the "Ask a subtle question" technique - to your friend or teacher.
The best question at the end is to encourage applause.
Conclusion of the lesson.
Backpacks are packed. Questions have been asked.
We're going on a hike
Leave in the morning?
Will take us on a long journey
road from the yard.
Our hiking backpack is ready,
There are matches, a bowler hat -
On a hike without him in any way,
And the knife in the pocket lay,
Take a rope and an ax
And the compass, and the food,
Our travel package
Will not let you get into trouble.
Carrying tents on your back
We'll leave in the morning
And go around the whole globe
With you my young friend
Phase 4 - homework.
Study § 1.4 and § 1.6 of the textbook.
Chat with your parents and friends about how they are going on a hike, and what difficulties they had to face in nature.
 Hiking discussion The most common and affordable form of hiking is one-day trips with friends. When developing a plan, it is necessary to discuss in detail the main goals of the campaign, which will need to be worked out during the campaign. Choose a hiking area and determine the route of movement. At the same time, it is necessary to keep in mind the attractiveness of travel and the feasibility of the tasks being worked out. The main thing is that during the trip you get to know the natural environment better and get satisfaction from communicating with it.
 Choosing a route When determining the area of travel, it is necessary to study it in detail. Then develop a route, which will require a large-scale map of the selected area. The start and end points of the route and the main landmarks through which the route will pass are set. It is better to choose turns on the route near characteristic, easily recognizable landmarks. (The distance between landmarks should not exceed 2 km.) After that, it is necessary to calculate the movement along the route. Calculations are made on the map or in a special table.
 Developing skills of orientation on the ground 1. At the starting point of the route, the orientation of the map is practiced, they establish their location on the ground and on the map, determine the direction of movement of the group along the route. 2. At landmark No. 1, training is carried out in determining the sides of the horizon according to the sun and clock and on the basis of local objects, and the direction of further movement is determined. H. On the segment from landmark No. 2 to the end point of the route, they work out determining the direction of movement and reaching the end point of the route without a compass. 4. At the end point of the route, bivouac work is carried out (a fire is made, food is cooked on a fire) and other tourist work. 5. On the way back, they consolidate their skills in orienteering.
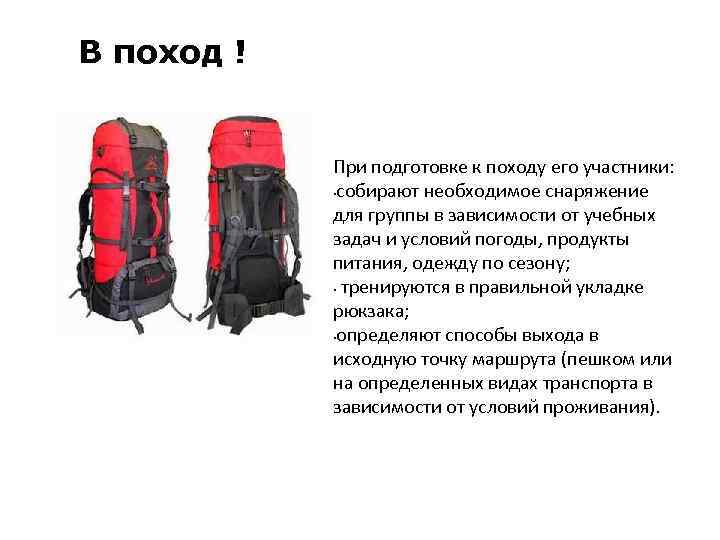 On a hike! In preparation for the trip, its participants: collect the necessary equipment for the group, depending on the training tasks and weather conditions, food, clothing for the season; train in the correct packing of the backpack; determine the ways to get to the starting point of the route (on foot or on certain types of transport, depending on the living conditions).

 Map Orientation Orientation on the ground involves, in addition to determining the sides of the horizon, determining one's location relative to surrounding objects and terrain, as well as choosing the desired direction of movement. To determine your location on the map, first of all, you need to orient it relative to the sides of the horizon, that is, hold it so that the upper side of the map is facing north. (All maps are drawn in such a way that their top is directed to the north.) In this position of the map, all directions to the surrounding local objects will coincide with the same directions on the map, and the relative position of local objects will correspond to their designations on the map.
 Orientation by compass When orienting the map according to the compass, it should be placed on the side of the map so that the north-south line of its scale coincides with the north-south direction on the map, and the zero division of the scale faces the north (upper) side of the map. Then you need to release the brake of the compass needle and, when it stops, start turning the map until the arrow with its northern end coincides with the zero division of the scale. In this position, the map will be oriented. Compass map orientation
 Orientation on the ground To orient the map on the ground, it is necessary to use some kind of characteristic linear landmark (a straight section of the road, a clearing in the forest, a characteristic section of the river bank), which is indicated on the map. The map must be rotated so that the direction of this linear landmark on the map coincides with its direction on the ground. Then you should check if all local objects located on the ground to the right and left of the selected landmark have the same location on the map, which will indicate that the map is oriented correctly.
 Orientation in direction To orient the map in directions to local objects, two objects chosen by you on the ground (tree, bridge, etc.) and depicted on the map are used. Standing at one of these local objects, it is necessary to put a pencil on the map so as to connect these two objects; now rotate the map until the pencil points to the second item on the ground. The map is oriented.
 Determining the direction of movement Once you have oriented the map and set your place on it, you can determine the direction of your movement to the intended area of your trip. You can choose the direction of movement either by local landmarks (by road, along a path, along a river, along a power line), or by azimuths using a compass.
 Azimuth Determining the azimuth It is necessary to mark on the compass scale a value equal to the specified (defined on the map) magnetic azimuth. Then, releasing the brake of the magnetic needle, turn the compass in a horizontal plane so that the northern end coincides with the zero division of the scale. Without changing the position of the compass, notice some distant local object on the terrain along the line of sight. The direction to it will be the direction corresponding to the given azimuth.

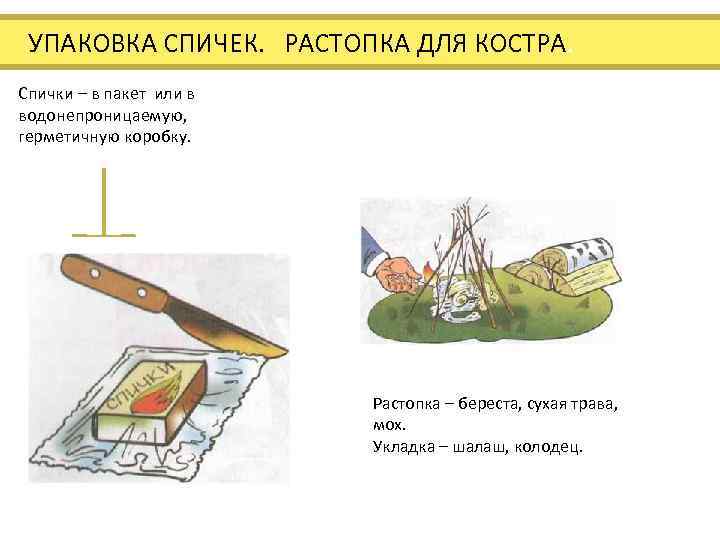 PACKAGING MATCHES. BURNING FOR A FIRE. Matches - in a bag or in a waterproof, sealed box. Kindling - birch bark, dry grass, moss. Laying - a hut, a well.

 WORKING WITH THE AX The ax must be protected. After work, cover with a cover. Remember! A sharp ax is no less dangerous than a loaded gun.
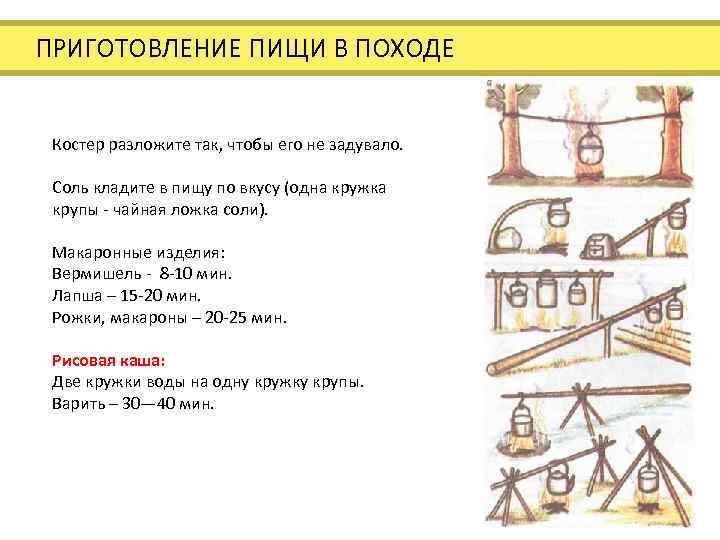 FOOD COOKING IN THE CAMPAIGN Lay out the fire so that it does not blow out. Salt put in food to taste (one mug of cereals a teaspoon of salt). Pasta: Vermicelli 8 10 min. Noodles - 15 20 min. Horns, pasta - 20 25 min. Rice porridge: Two cups of water for one cup of cereal. Boil - 30-40 min.
 EXAMPLE SET OF PERSONAL EQUIPMENT OF A TOURIST. Backpack, suit, socks, tent, hat, hairbrush, shoes, sweater, sleeping bag, tube of mosquito ointment, dishes, mosquito net, rocket launcher Compass, map, ax
 REQUIREMENTS FOR EQUIPMENT Camping equipment should be: reliable, durable, comfortable and light. The weight of group equipment on a hike should not exceed 5 kg per person. Equipment for various types of hikes
 FIRST AID KIT. The first aid kit is completed taking into account the size of the group, the complexity of the trip, the distance of the route from settlements and the time of year. Set: sterile bandages (narrow and wide 2 pcs per person), adhesive plaster, thermometer, rubber tourniquet, scissors, tweezers, pipette, sterile cotton wool, iodine tincture, medical alcohol, potassium permanganate (potassium permanganate), hydrogen peroxide, brilliant green solution (brilliant green), a set of antipyretic, analgesic and food poisoning drugs with a description of their dosage and methods of their application. The first-aid kit is placed in a rigid package, which excludes damage to the thermometer, ampoules, vials, and also protects it from water and snow.

 Weather is the main factor Weather is the main factor on which human safety in natural conditions depends. Some weather phenomena significantly complicate the stay of a person in the natural environment. When going on a hike, you need to find out how the weather changes in the places of the planned vacation at different times of the year.
 We know that ... From the experience of organizing outdoor activities, it has been established that for any area and each type of hiking trip (hiking, mountain, water, skiing), the most favorable and unfavorable seasons can be distinguished in terms of weather conditions.
 For mountain and ski trips So, for amateur mountain trips, the second half of summer (July-August) is considered the most favorable season in almost all regions of the country. For ski tourism in the middle lane, March is preferable, and in the northern regions, March-April.
 In bad weather Experienced tourists advise in case of short-term heavy precipitation (heavy rain) to stop at the first convenient place and wait out the bad weather in shelter, under an awning or a cape.
 Crossings in snow and rain You can continue moving in rain and snow on a technically simple section, along trails, on flat terrain, covered with a cape. Immediately after the transition in the rain (or in the snow), it is necessary to organize a bivouac, best of all in a shelter where you can make a fire, change clothes, and dry your wet clothes and shoes.
 What to do during a thunderstorm Be especially careful during a thunderstorm. This weather phenomenon is associated with the development of cumulonimbus clouds and the accumulation of large electrical charges in them. The greatest danger to humans is a direct lightning strike.
 Lightning is a giant electrical discharge that occurs between thunderclouds or between clouds and the ground. The currents generated in the ground during lightning strikes on the earth's surface are also dangerous.
 Storm harbingers are powerful cumulonimbus clouds, multiple flashes of lightning, thunder. Just before the start of a thunderstorm, there is usually a lull or the wind changes direction, then suddenly the wind (swell) increases sharply and it begins to rain.
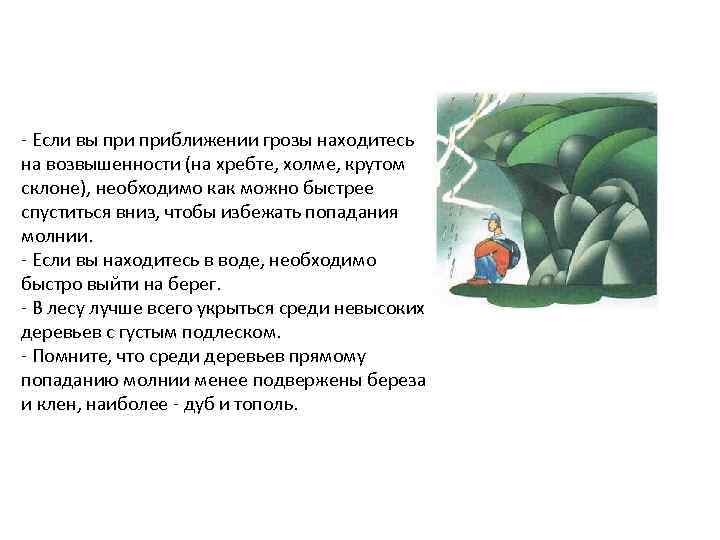 First Steps If you are on high ground (ridge, hill, steep slope) at the approach of a thunderstorm, you need to get down as quickly as possible to avoid being struck by lightning. If you are in the water, you need to get ashore quickly. In the forest, it is best to hide among low trees with dense undergrowth. Remember that among trees, birch and maple are less susceptible to direct lightning strikes, oak and poplar are the most susceptible.
 We take shelter In open areas, you should choose sandy or rocky areas, you can hide in a dry hole, ditch, ravine. In the mountains, it is undesirable to seek shelter from a thunderstorm in small grottoes (shallow caves with a wide entrance), rock pits, depressions, as there is a danger of being struck by currents formed in the ground after a lightning strike.
 In a cave If you still had to hide in a cave, grotto, large depression, you can’t be at the entrance or in the far corner of such a place, the position of a person is safe when the distance between him and the walls is at least 1 m.
 Remember! During a thunderstorm it is impossible: to be located next to the railway track, near a reservoir, near a high object (tree); lean head, back or other parts of the body against the surface of rocks, tree trunks; stop at the edges of the forest and forest clearings.
 What to do during a snowstorm In a snowstorm, with strong wind and cold, a person's normal breathing is disturbed, the heat-shielding properties of clothing are reduced, due to poor visibility, he loses his bearings, can get lost, exhausted and die.
 What to do during a blizzard A blizzard does not come suddenly. Before it begins, there is an increase in air temperature and a gradual increase in wind speed. A harbinger of a blizzard is the appearance of a dark gray or black cloud growing on the horizon with changing outlines. The wind gradually intensifies and becomes gusty, which raises the snow and disperses the snow. A cloud covers the entire sky, and a blizzard begins.
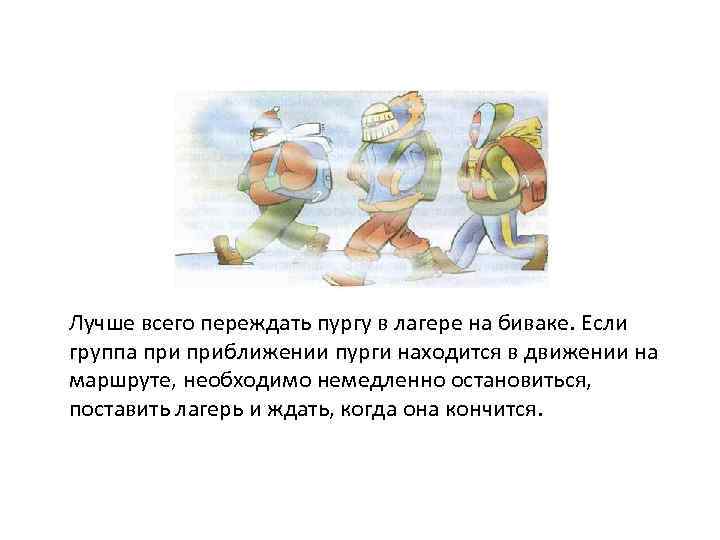 What to do during a blizzard It is best to wait out a blizzard in a bivouac camp. If a blizzard group is moving along the route, it is necessary to stop immediately, set up camp and wait for it to end.
 What to do during a blizzard The primary task facing a group of tourists before or after the onset of a blizzard is to set up a bivouac. When pitching a tent, you should find at least partial shelter from the wind. The tent is set up with an entrance on the leeward side, its extensions are fixed by sticking them into the snow with skis or ski poles. After setting up the tent, backpacks are brought in, which are placed at the rear windward wall and at the corners of the tent.
 What to do during a blizzard When setting up a bivouac in a blizzard, you must not leave the tent. A tourist who has moved away from the tent and lost sight of the camp must return back in his footsteps. If the tracks are covered, you should stop and take all measures to independently arrange a temporary shelter.
 Signs of worsening weather If it is clear during the day and the clouds thicken in the evening, then rain or a change in weather should be expected. Wavy (altocumulus) clouds resembling ripples or crests of waves are a sure sign of the onset of inclement weather after a few hours. The air temperature in winter rises slightly, warming sets in. In summer, the difference between the air temperature during the day and at night decreases, in the evening it is warmer than during the day. The wind intensifies, especially in the evening, the regular daily changes in local winds are disturbed. Cloudiness increases, clouds move in the opposite direction or across the direction in which the wind blows near the earth's surface. The sun sets in a cloud, the evening dawn has a bright red color.
 Questions and tasks Why do you need to know the weather forecast before going out into nature? How can you ensure your protection from atmospheric precipitation in natural conditions? How dangerous is a thunderstorm for a person in natural conditions? How can you ensure your safety if a thunderstorm has caught you in nature? 5. What precautions should be taken to protect against snowstorms?
 REVIEW QUESTIONS 1. What items does personal, group and special tourist equipment include? 2. What factors determine the selection of items of tourist equipment? H. List the basic requirements for tourist equipment. 4. How should you choose shoes and clothes for going out into nature? 5. Why do you need a first aid kit on a hike and what should it include? 6. If you are preparing to hike in September, make a list of personal equipment for the hike.
 Questions and tasks 1. Why is it necessary to orient the map on the ground? 2. How is the map oriented with a compass? 3. How can the map be oriented along terrain lines and directions to local objects? 5. How to determine the direction of your movement on the ground? 6. What is the essence of movement along the route in azimuths? 7. Practice orienting the map using the compass, the sun, and the clock.
 Questions and tasks 1. What is the preparation for a hike in nature and what does it include? 2. How is the study of the area of the campaign carried out and what is the focus of attention? Z. How do you choose a route for a hike and determine its main stages? 4. What organizational issues should be solved by the participants of the campaign in preparation for it? 5. Using a large-scale topographic map (1: 500,000 or 1: 250,000), study the area of \u200b\u200bthe proposed campaign. Determine the starting and ending points of the trip and the reference points between them.
Summary of the lesson on life safety grade 6 Preparing for a trip to nature Determine the necessary equipment for a hike
The purpose of the lesson: to familiarize students with the need to prepare for a hike in nature, what it includes and what equipment is needed for the hike.
Time: 1 hour.
Lesson type: combined.
DURING THE CLASSES
I. Organizational moment.
II. Repetition of the material covered.
- Conversation on:
- Why is it necessary to orient the map on the ground?
How is a map oriented with a compass?
- How to determine the direction of your movement on the ground
- Lesson topic message
III. Presentation of the program material.
The story of the topic of the lesson.
- Preparing to go out into nature.
Now that you know how to navigate the terrain, determine the sides of the horizon in different ways, use the map, establish your location on the ground and on the map and choose the right direction of movement, you need to consolidate all this in practice. The most accessible and effective way to acquire the skills and abilities of a safe stay in natural conditions can be considered the preparation and conduct of hiking trips.
The most common and affordable form of hiking trips are one-day trips with parents or a teacher.
In order for any outing to be successful, it is necessary to prepare well for it.
We will consider one of the possible options for preparing for a one-day hike, the purpose of which will be to obtain initial skills in orienteering as one of the elements in ensuring human safety in natural conditions.
When preparing for a hike, you need to take an active part in developing its plan together with your parents or with a group of classmates under the guidance of a teacher, if you are going on a hike in a class.
When developing a plan, it is necessary to discuss in detail the main goals of the campaign and the educational tasks that will need to be worked out during the campaign. With this in mind, choose a hiking area and determine the route of movement. At the same time, it is necessary to keep in mind the attractiveness of travel and the feasibility of the tasks being worked out. The main thing is that during the trip you get to know the natural environment better and get satisfaction from communicating with it.
Determining the area of travel, it is necessary to study it in detail. Then develop a route, for which you need a large-scale map of the selected area. The start and end points of the route and the main landmarks through which the route will pass are set. It is better to choose turns on the route near characteristic, easily recognizable landmarks. (The distance between landmarks should not exceed 2 km.) After that, it is necessary to calculate the movement along the route. Calculations are made out on a map or in a special table.
To develop the skills of orienteering in the area, four training points can be included in the plan of a one-day trip according to the stages of the route: the starting point of the route, the point at landmark No. 1; point at landmark No. 2, the end point of the route.
Learning objectives can be divided as follows:
1. At the starting point of the route, they work out the orientation of the map, establish their location on the ground and on the map, and determine the direction of movement of the group along the route.
2. At landmark No. 1, training is carried out in determining the sides of the horizon according to the sun and clock and on the basis of local objects, and the direction of further movement is determined.
3. On the segment from landmark No. 2 to the end point of the route, they work out determining the direction of movement and reaching the end point of the route without a compass.
4. At the end point of the route, bivouac work is carried out (a fire is made, food is cooked on a fire) and other tourist work.
5. On the way back, they consolidate their skills in orienteering.
In preparation for the trip, its participants collect the necessary equipment for the group, depending on the training tasks and weather conditions, food, clothing for the season; train in the correct packing of the backpack; determine the ways to get to the starting point of the route (on foot or on certain types of transport, depending on the living conditions).
- Determination of the necessary equipment for the trip.
Preparation for going out into nature for outdoor activities requires not only determining the place and purpose of the trip, developing a route and studying the area of the trip, but also a thoughtful selection and preparation of tourist equipment. The choice of tourist equipment depends on the type and characteristics of the trip (hiking, water, bicycle, one-day or multi-day, etc.), on the season and weather. All tourist equipment can be divided into personal, group and special.
Tourist's personal equipment is clothes and shoes, a sleeping bag and washing accessories, personal utensils and a backpack. Group equipment includes tents, cooking utensils, axes, maps, diagrams, a compass and other items for collective use. Special equipment - these are items for both group and personal use, which are determined by the characteristics of the hike: means of transportation for tourists (bicycles, boats, skis); means of insurance (ropes, life jackets), etc. A necessary accessory for a tourist's equipment is a first aid kit.
Camping equipment must meet a number of general requirements: to be reliable, durable, comfortable and light. The weight of group equipment on a hike should not exceed 5 kg per person.
A necessary accessory for a tourist's equipment is a first aid kit, which is completed taking into account the size of the group, the complexity of the hike, the distance of the route from settlements and the time of year. A typical first-aid kit may include: sterile bandages (narrow and wide) at the rate of two packs per person, bactericidal and ordinary adhesive plaster, thermometer, rubber tourniquet, scissors, tweezers, pipette, sterile cotton wool, iodine tincture, medical alcohol, potassium permanganate (potassium permanganate) , hydrogen peroxide, a solution of brilliant green (brilliant green), a set of antipyretic, analgesic and food poisoning drugs with a description of their dosage and methods of their use. The first-aid kit is placed in a rigid package, which excludes damage to the thermometer, ampoules, vials, and also protects it from water and snow. It is necessary to put the first-aid kit in a backpack in such a way as to ensure its safety and the ability to easily get it if necessary.
When preparing equipment for a hike, one rule must be taken into account: each tourist must have matches. In addition, two or three carefully packed boxes of matches are taken as a group emergency supply.
In conclusion, we note that tourist equipment that has not been tested on a hike must be checked in conditions close to hiking.
IV. Lesson summary
- Fixing the topic of the lesson
Why do you need to prepare for a hike in nature and what does it include?
- How is the study of the area of the campaign carried out and what is the focus of attention?
- How do you choose the route of the campaign and determine its main stages?
- What organizational issues should be solved by the participants of the campaign in preparation for it?
- Homework § 1.4 and 1.6
On a large scale topographic map (1:500,000 or 1:250,000), study the area of the proposed campaign. Determine the starting and ending points of the trip and the reference points between them.

- Introduction
- Classification of juvenile crimes
- Hooliganism and vandalism
4. Conclusion
OBJ teacher
Kovalev Alexander Prokofievich
Secondary School No. 2
Mozdok

It is advisable to start the preparation by studying the area of the hike, choosing the end point of the hike (a picturesque place, a lake, a river bank, a forest glade, etc.) and determining the route of movement.
The travel area should be familiar, since the purpose of the trip is not to discover "new lands", but to develop skills of behavior in natural conditions.
To select the end point of the route, you must be guided by three main criteria:
- area area, chosen as the end point of the trip, should be suitable for a large halt (arranging the preparation of lunch and rest for tourists, as well as practicing tourist skills in setting up a tent, making a fire, overcoming obstacles on the ground, etc.);

- daylight hours calculation should be sufficient to return to the starting point with a reserve of at least 1 hour.
- distance to the selected point on the ground should be no more than 10 km one way;

Date, day of the week in May 2014
Sunrise
Sunset
Longitude of the day
Determining the optimal time for gathering a group and going on a hike . The calculation must be made from determining the time of return to the collection point + 1 hour of reserve time.
Determining the time spent on a hike, taking into account the tasks to be solved: time in motion to the place of a large halt up to three running hours and 3 hours to return to the starting point of the route; 4 hours stay at a large halt. Total 10 hours of time for a hike.

If you may have to get to the starting point of the route by some type of transport (bus, train), then it is also necessary to provide time for this. Let's say it will be 1.5 hours. Therefore, there and back 3 hours.
Thus, the trip itself takes 10 hours, the time before arriving at the starting point of the route and returning to the collection point is 3 hours + 1 hour of reserve time.
As a result, we get 14:00. If we assume that the time of return to the place of collection is at 22:00 (10:00 in the evening), then, then, the time of collection for going on a hike is at 8 (22-14) in the morning. The place of collection is determined by the teacher. It could be a school, a bus stop, or a suburban ticket office.
Having determined the time possibilities of the group, they outline the end point of the trip, study the travel area and lay the route

After determining the final site (lake, river bank, picturesque forest glade, etc.), you must select the route of movement taking into account the terrain . It is chosen so that it has a minimum number of turns. Route turning points are marked at characteristic, easily recognizable landmarks. The distance between landmarks should not exceed 2 km.
Having chosen the starting and ending points of the route, having outlined control landmarks, the order of movement along the route is calculated.
Depending on the educational tasks set, the group can have one tent, campfire equipment (taganka in a case, a saw in a case, large and small axes in cases, matches in waterproof packaging), kitchen equipment, route documents and equipment (route map - 2 copies ., compass - 2 pcs., group money, repair kit, first aid kit).

A sample list of personal equipment for a one-day camping trip:
- a large backpack with wide shoulder straps and a waist belt;
- spare shoes (sneakers);
- jacket with a hood (storm jacket);
- light headdress (hat);
- two pairs of socks;
- polyethylene cape from the rain;
- mug, spoon, bowl, folding knife;
- flask for drinking water.
A properly selected set of personal equipment should not exceed 6-8 kg in weight.

Next, you need to practice in the correct packing of the backpack and in determining the sides of the horizon by the sun and the clock. This method gives satisfactory results in winter. In summer, especially in southern latitudes, errors can reach more than 25 0 .
To determine the sides of the horizon by the sun and the clock, the watch is held horizontally (Fig. 1). The hour hand is pointed at the sun. The angle between the hour hand and the number 12 (if the clock is set in local time), or the number 1 (if the clock is set in standard time, the period October - April), or the number 2 (if the clock is set in summer time, the period April - October) divided in half. The bisector of the angle formed between the hour hand and the numbers 12, 1, 2, respectively, will show the direction north-south (south will be in the direction of the sun

Determination of the direction of movement and its maintenance. To resolve this issue, it is necessary to recall the concepts of magnetic and true azimuths and the procedure for their determination.
Azimuth – is the angle measured clockwise between the north and the landmark. Azimuth is measured in degrees from 0 to 360 0 .
If the geographical meridian is taken as the initial direction, the azimuth is called true; if the magnetic meridian is taken as the initial direction (the direction of the magnetic needle of the compass is north-south), the azimuth is called magnetic

The compass determines the magnetic meridian. The true meridian is removed from the topographic map. To move from the true meridian to the magnetic one, you need to know the magnitude of the magnetic declination, which is indicated on the map. In places where there are no magnetic anomalies, the magnetic meridian and the true meridian have a declination of 2-3 0, which is of no practical importance for our movement in azimuth.
When preparing for a hike on the map, it is necessary to lay the route of movement, determine the reference points and their true azimuths (taken from the map).
To maintain the direction of movement on the ground according to the calculated azimuths, it is necessary:
1. go to the starting point of movement, from which the azimuth to the first reference point is calculated on the map;

2. using a compass to determine the magnetic azimuth of movement; to do this, you need to turn the compass in a horizontal plane so that the northern end of the arrow is set against the zero division of the scale; without changing the position of the compass, notice on the ground along the line of sight through the rear sight and front sight some distant object.
The direction to it will be the direction corresponding to the given azimuth.
The hike starts from building , during which the readiness for the hike is checked (how the tourists are dressed and shod). When inspecting backpacks, it is necessary to check if any of the equipment or food has been forgotten. Then you should remember the rules of conduct, the features of the route, the approximate time of return. After the clothes, shoes, backpacks are checked, the group follows the established procedure to the starting point of the route.

After the group arrives at the final destination of the trip, a big halt . When stopping, one or two people go for water, one goes to the formation of a fire, and the rest go for fuel. Then a fire is lit.
After water and firewood are brought and a fire is kindled, the attendants remain near it, watching the fire and preparing food. The rest are resting.
During the lunch break, you can dry your clothes and personal equipment, practice choosing a site and setting up a tent. The duration of the lunch break should be approximately 4 h. After lunch (rest), the group prepares for a trip to the starting point of the route.

Group fees start with packing backpacks and cleaning up the camp site. All garbage is carefully collected and burned. Empty cans are burned in a fire and buried in the ground, after which they rake and extinguish the fire.
You must go on a hike only with an adult leader.
A novice tourist should learn how to use a compass well, know an approximate list of personal equipment, and be able to pack a backpack.
A big halt is organized after the group arrives at the final destination of the trip.
Movement along the route in the opposite direction is carried out in compliance with the same rules as when moving to the place of a large halt

The most accessible and effective type of preparation for an autonomous stay of a person in the natural environment is active tourism .
Active tourism is characterized by the fact that tourists move along the route due to their own physical efforts and carry all their cargo with them, including food and equipment.
The main goal of active tourism is active recreation in natural conditions, restoration and promotion of health.
Homework
§ 9.4 pp. 166-168


: how to do it, position, examples, templates, design samples free download")
