Mokume gane technology in modern jewelry
Collection output:
MOKUME GANE TECHNOLOGY IN MODERN JEWELERY
Baranova Olga Konstantinovna
applicant degree Candidate of Sciences, Assistant of the Department of Technology of Artistic Processing of Materials and Jewelry Art of St. Petersburg state university technology and design, Russian Federation, St. Petersburg
Chalova Ekaterina Igorevna
postgraduate student, assistant of the department of technology of artistic processing of materials and jewelry art, St. Petersburg State University of Technology and Design, RF, St. Petersburg
Baranova Alexandra Ivanovna
teacher of the Kamchatka Industrial College, RF, Vilyuchinsk
USING MOKUME GANE IN MODERN JEWELRY
Olga Baranova
candidate for a degree of candidate of sciences, assistant of the department of artistic manufacturing of materials and jewelry in Saint-Petersburg University of Technology and Design, Russia, Saint-Petersburg
Ekaterina Chalova
postgraduate, assistant of the department of artistic manufacturing of materials and jewelry in Saint-Petersburg University of Technology and Design, Russia, Saint-Petersburg
Alexandra Baranova
professor 1st category in Kamchatskiy Industrial College, Russia, Viluchinsk
ANNOTATION
The analysis of the ancient method of metal processing - the traditional Japanese technique "mokume gane", known since the 17th century, the ways of its development during this period, the emergence of new manufacturing technologies, as well as advice on the practical manufacture of jewelry using this technique.
ABSTRACT
Analysis of the ancient method of metal treatment - traditional Japanese technique “Mokume Gane”, known since the 17th century, its development through the period, new technologies of manufacturing, and given advices on practical manufacturing of jewelry in this technique.
Keywords: jewelry production; design; jewelry manufacturing technologies; traditional art of Japan; mokume gane.
keywords: jewelry manufacturing; design, technology of jewelry; traditional Japanese art Mokume Gane.
AT jewelry people appreciate not only beauty, but also uniqueness. Jewelry itself can be both decorative (for the wearer) and a form of self-expression (for the maker), so some of them are considered works of art. Jewelery made in the Japanese traditional mokume gane technique can be safely attributed to this category, because each of them is an independent, unique miniature masterpiece that has both aesthetic and material value.
“There are many different techniques practiced in jewelry. Some of them appeared quite recently, others are associated with ancient traditions passed down from generation to generation. Mokume gane is a traditional, time-honored technique steeped in history, breathed new life into modern technology.
"From Japanese, the term "mokume gane" can be translated as "metal that looks like wood"". This is an ancient metalworking method invented in the 17th century by master Denbei Shoami, with which he decorated the hilts of samurai swords (Figure 1). Samurai occupied a high position in the society of medieval Japan, but not every one of them could afford such a luxury. Exquisitely decorated handle served as a symbol of high status and wealth of the owner.
Figure 1. Blades of a katana made using the mokume gane technique
The principle on which Mokumegane is based is the same as in the manufacture of samurai swords. Several plates of precious metals, which include traditional Japanese alloys (for example, Shakudo - an alloy based on 96% copper and 4% pure gold) are welded together in diffusion at high temperature. The depth of interpenetration of Mokume metals is about 0.025 mm, and it is the growth of new crystals in this zone that holds the plates together. After joining the plates together, they are processed and textured in such a way that small areas of the surface of each layer are exposed.
The complexity of the technology lies in the fact that different, sometimes practically incompatible metals are interconnected in bizarre and very beautiful patterns that never repeat.
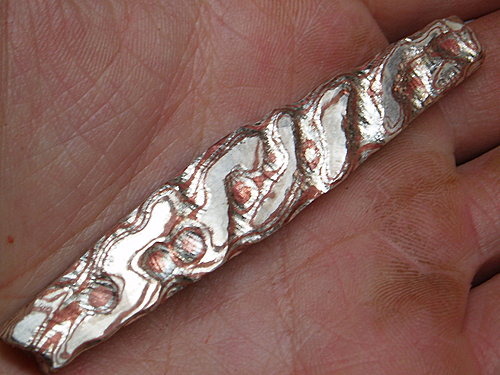
As a result of processing by the mokume gane technique, the metal acquires a layered pattern, reminiscent of tree rings or bark in texture. "These unique patterns are a kind of celebration of the natural beauty of wood, embodied in cold, powerful metal." AT modern world samurai swords are only popular with collectors, and the status of a samurai has no such of great importance, but, nevertheless, Mokume Gane got this wide use and adoration, which has been embodied in art and fine jewelry.
The traditional technique of mokume gane was to fuse together several sheets of different metals by melting. Modern masters and new technologies have brought some changes to the process, but the essence of the process remains unchanged.
To date, there are two main methods for making Mokume gane: the method of fusion in a furnace and the manufacture using solder.
The first method consists in compiling an integral composition of two or more dissimilar metals, which were superimposed on each other in layers, creating a homogeneous alloy under heat treatment conditions. In the tradition of Japanese technology, such an alloy was achieved through diffusion welding in coal forges.
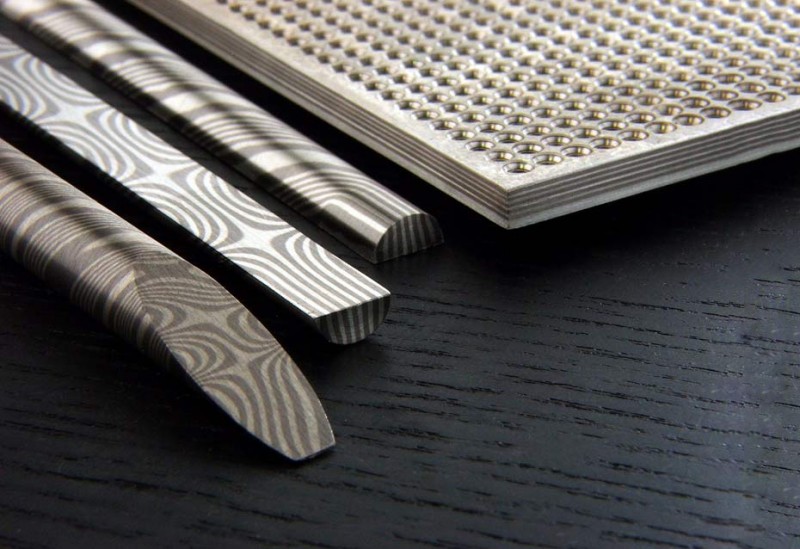
Currently, various combinations of metals suitable for this technique are known: yellow, pink and white gold, nickel, palladium, platinum, titanium, zirconium, bronze and brass.
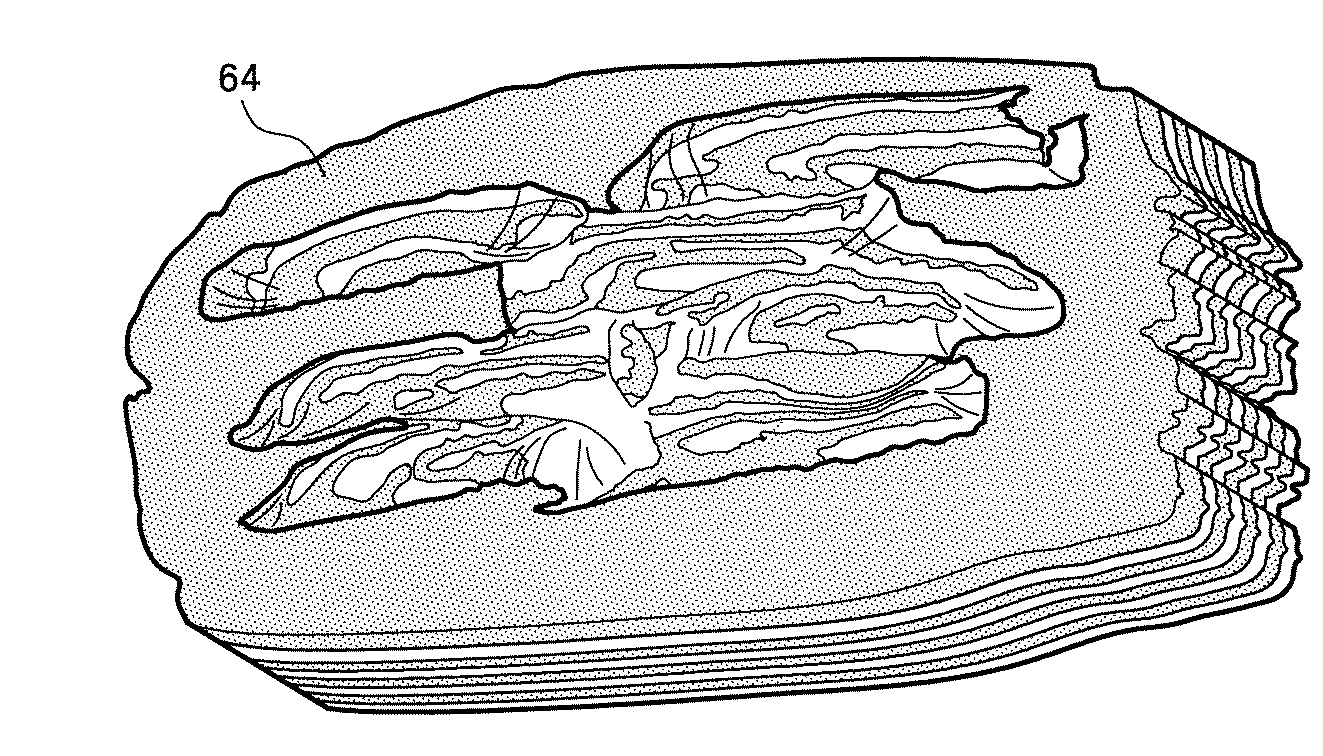
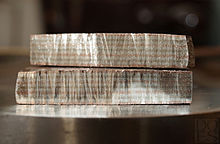
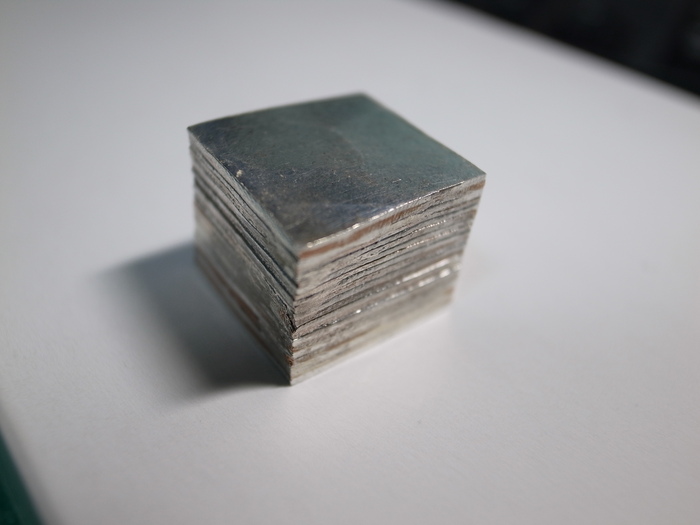
The essence of the mokume gane method is that sheets of various jewelry metals are folded in layers alternating in color (Fig. 2). The number of layers reaches several tens. Then the workpiece is heated at a high temperature so that the metals begin to sinter together. Diffusion of metals occurs in the solid phase. The most important and difficult thing is to firmly connect different metals and at the same time not exceed the melting temperature so that individual layers are preserved.
. 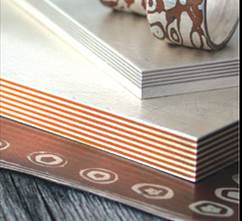
Figure 2. Flat blanks before twisting the layers
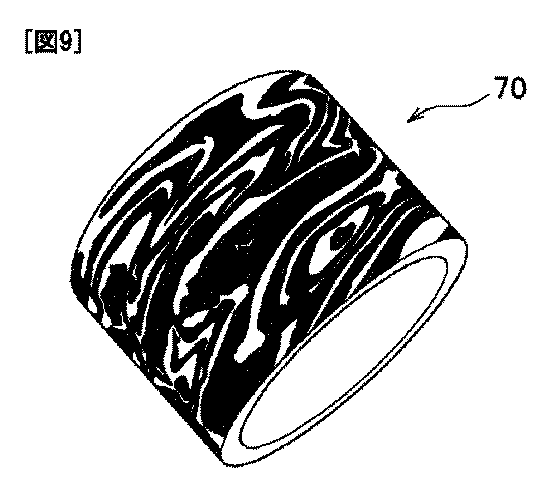
Next, the learned workpiece is pressed, forged, twisted so that the flat layers become sinuous. Heated to relieve internal stress. And so many times. Sometimes many regular depressions are cut into the metal through several contrasting layers to expose the design. Then again subjected to forging to make the workpiece flat. The process is long and complicated. The nature and interestingness of the pattern depend on the experience of the master (Fig. 3).
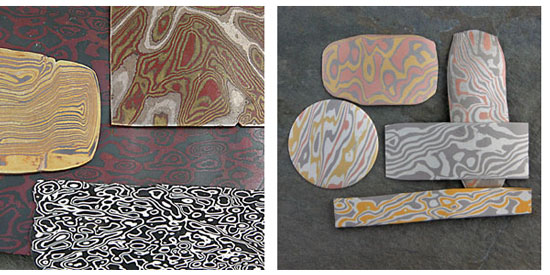
Figure 3. Alloy in the technique of "Mokume Gane"
Let us consider in more detail the second manufacturing method, which does not require complex and expensive equipment.
Making Mokume using solder can also be divided into two methods: soldering the wire and soldering the plates. If the wire manufacturing method can be considered simple, since the wire has a small surface contact area, which does not create special problems when soldering, then when soldering flat surfaces of plates, everything is more complicated. Let's consider the last method in more detail:
1. First, you should select metals for soldering according to their compatibility in terms of malleability and ability to be soldered with silver solder. Usually it is copper, copper alloys, silver and gold.
2. Cut the selected metals into two equal strips no more than 25 mm wide. The length of the strip is not a problem, but for small items, blanks with a length of 50-100 mm are suitable. The thickness of the workpiece must be at least 1.5 mm, otherwise the plates will be easily deformed during soldering, which will greatly affect the quality of the soldered surfaces. Try to use as thick a metal as possible to reduce the surface area for soldering. But at the same time, do not forget about the limitation of the distance between the shafts on the rollers, which are yet to be used. In most cases, it varies from 3 to 6 mm. Thus, the workpiece should be a flat narrow strip.
3. Perfectly align the surfaces of the plates so that the gap between them is minimal. Sand so that there are no oxide spots on their surface. Then chamfer the long side, which will serve as a groove between the plates for precise solder flow. The polishing of the surfaces to be joined is also important, since the solder spreads much better over the polished surface.
4. Connect the plates so that the beveled sides of the chamfers match. Tie both blanks with a relatively thick wire (bindra) so that there is an equal distance between the turns of the wire. It is important to leave 6 mm loops on top. They will help to hold the workpiece at an angle when soldering. The wire must be well taut to securely hold the metal.
5. Dip in a thick borax solution or use creamy borax. Use high-melting silver solder throughout the entire process. This will lower the temperature of the solder used in the future. Solder is preferably used in wire form.
6. Preheat the block with a large bushy flame on a turntable until it glows dull red. At this point, reduce the flame and concentrate it in the center of the metal being joined. When the desired temperature is reached, start feeding solder between the plates using the V-notch. Don't feel sorry for the solder. Next, rotate the stand, heat from the back and stretch across the entire width of the plates. Remember the rule: solder flows where the temperature is higher. Therefore, when supplying solder from one side, it is necessary to heat it from the opposite side until the solder appears between the plates. Make sure that the plates are completely soldered with a continuous seam of solder protruding around the entire perimeter.
7. Cool slowly, remove the wire and bleach. If the plates are not completely soldered, after bleaching, rinse in an ultrasonic bath, rinse in water and dry. Lightly roll in the rollers so that the plates fit tightly. Then re-coat with flux and heat the plates to the required temperature until the solder is completely shed.
8. Align the workpiece, grind. Optionally, a third metal can be added by repeating the previous process. Roll the resulting plate in length until it doubles. Cut in half and solder the two halves together again, doubling the number of layers.
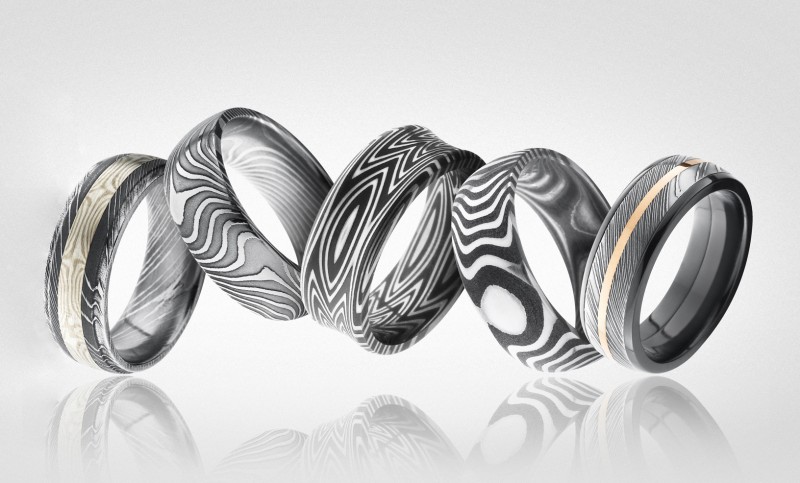
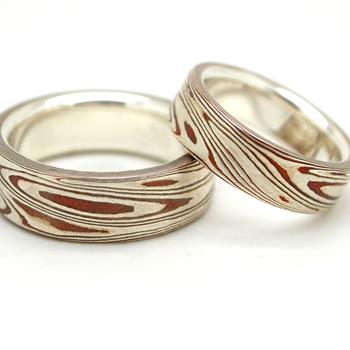
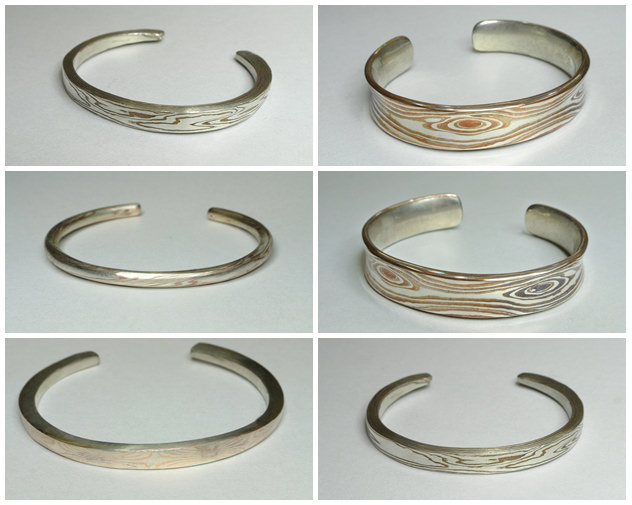
This process can be continued any number of times. But with an increase in the number of layers, are lost physical properties metal: metal becomes hard and brittle, and an excessive number of layers can lead to the loss of the desired decorative look. After the required number of layers has been accumulated, it is desirable to solder a thick metal base to the brazed plates. To obtain the desired shape and thickness, the resulting workpiece should be rolled in the required directions, cut and soldered from it the required parts. Then anneal and mint the metal from the inside, obtaining a relief surface. The resulting relief from the outside is sharpened with a file and sandpaper. After grinding, the metal is polished and finished, "and the right finish will bring out the pattern and texture of the metal, as well as the true color of the alloys used." Modern jewelry made using the mokume gane technique is shown in Figure 4.
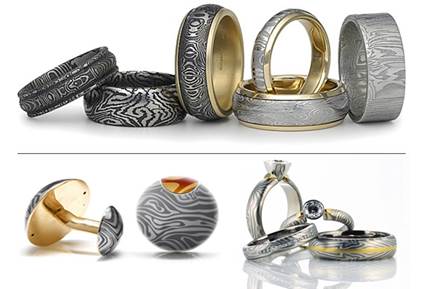
Figure 4. Jewelry made using the mokume gane technique
Jewelry created using the mokume gane technique combines the spirit of medieval Japan, the natural beauty of wood patterns, the cold power of metal, and is contemporary works art.
Bibliography:
1. Mokume-gane // Internet magazine "Dekorata.ru". - 2010 - No. 1 [Electronic resource] - Access mode. - URL: http://dekorata.ru/NN/01/mokume-gane.html (accessed 17.02.2014).
2. Ponomareva K.S., Zhukova L.T., The use of texture when creating objects from decorative and ornamental stone, Design. Materials. Technology. - 2014. - No. 4(34) St. Petersburg: SPGUTD - 220 pages.
3.Richard Fuller, Ron Gregory, Japanese Swords. Encyclopedia of edged weapons, AST, Astrel, Harvest, 2010 - 288 pages
4. Robert Coogan, James Bignon, Steve Midgett, Mokume Gane. Full review , Dedal-Press, 2005 - 160 pages
Mokume Gane is a Japanese technique for working with metals. If we try to translate its name literally, we get the following set of words: "mo" - wood, "kume" - texture, "gane" - metal. Its essence lies in obtaining a composite product consisting of several different metals, which form a decorative pattern on its surface, reminiscent of wood in texture.
The history of the birth of technology
The mokume gane technique appeared at the end of the 17th century thanks to the samurai sword maker Denbei Shaomi. It is believed that the idea of connecting dissimilar metals together is the result of an oriental economical approach to production. Due to the shortage of precious metals, they tried to find a worthy replacement that would not detract from the nobility of the samurai sword.
One way or another, Shaomi passed on the developed technology to numerous students who continuously supplemented and improved it. Over time, Mokume began to be used not only for decorating weapons, but also in the manufacture of household items: vases, dishes, jewelry.
The essence of mokume gane technique
The first products were made of shakudo alloy (shakudo), consisting of 90–96% copper and 4–10% gold, but then other metals began to be used: platinum, palladium, silver, nickel, zirconium, titanium, and bronze.
The first stage of the mokume gane method is to obtain a multilayer workpiece from metals that are different in color and ductility. In addition, to create a contrasting ornament, it is worth considering that in the process of heating and chemical reactions materials can change their shades. Precious sheets of different thicknesses are thoroughly cleaned from dust, oxide and grease films and stacked on top of each other in a given sequence, the number of layers can reach several tens. Then the sheets are placed in a furnace, where, under the influence of a certain temperature, the process of diffusion of metals in the solid phase is carried out.
It is especially important that the degree of heating should be exactly such that the sheets begin to fuse together, but do not pass into the liquid phase, forming a single workpiece with clearly defined boundaries between the layers. The difficulty lies in the fact that each metal has its own melting point, and sometimes craftsmen manage to achieve the most incredible combinations.
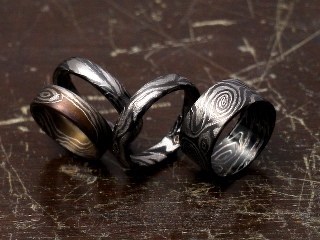
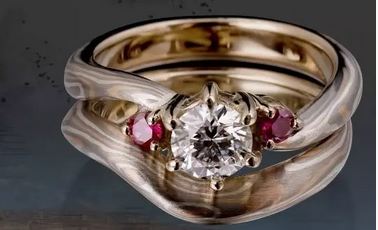
An example of making wedding rings using the mokume gane technique.
The resulting piece of metal is repeatedly pressed, cut, minted, forged, twisted like dough so that the inner layers are on the surface and the flat borders lie down in a new intricate pattern. Each created pattern is unique, even the exact repetition of all technological steps with the same materials does not allow you to get a pair of identical products.
Modern tendencies
For more than two centuries, the mokume gane technique remained unknown outside of Japan. Only in late XIX century, unusual products began to be exported to European countries. A lot of time and effort was spent by Western craftsmen to unravel the mystery of oriental metal wood. Due to the complexity of technology, high-quality products are still very rare today. Despite the modern achievements of jewelry production and the availability of technological equipment, there are hardly a hundred truly qualified craftsmen working in this direction in the world.
Today, jewelry made using the mokume gane technique is considered exclusive jewelry and has a corresponding value. In addition to the uniqueness of each item and the laboriousness of its production process, an additional cost factor is a large amount of non-returnable waste, since the precious metals used after diffuse welding cannot be further processed.
MO - WOOD.
KUME - TEXTURE.
GANE - METAL.
To understand the difference between the traditional mokume lamination process and the electric oven method of making mokume, it is necessary to have some knowledge of how the lamination process works. In each method, the metal plates to be laminated are cleaned, stacked and clamped between two steel plates.
In the traditional process, the collected briquette is placed in a kiln or hearth that uses charcoal, coal, or gas (as in Steve's mini-oven) as fuel. There it is heated until the metal on the surface gleams or sparkles. The briquette is then taken out of the oven and possibly subjected to a quick forging in order to harden the bonding layer. The key to the fusion of the layers is the appearance of a "sparkle". If the briquette is left in the oven for too long after it shines, the laminate will most likely overheat, leaving you with a puddle of mokume. Therefore, you must follow the briquette with a hawk's eye in order to react at the right moment. Note that the appearance of brilliance is a very curious thing: the metal shines as if it were melted, but it is still solid! The fact is that only a small amount of metal in the briquette is melted, and it is this that connects the layers of metals together. And now: how does a briquette not turn into a puddle in the presence of molten metal in it? To understand this, a short digression into metallurgy is necessary.
A pure metal, like pure silver or 999 gold (24K), melts at a well-defined temperature, which we usually call the melting point. In metallurgical terms, the temperature at which a metal becomes liquid is called the liquidus point, and the temperature at which it solidifies upon cooling is called the solidus point. If a pure metal is heated to a liquidus temperature of minus 1 degree, it is still solid; once it is heated above the liquidus point, it becomes liquid. Conversely, when the metal cools to a temperature slightly above the solidus point it is still liquid, when it cools to the solidus point it becomes solid again.
In many alloys, individual metals are combined in such a way that all grains have the same composition. For example, if you craft an alloy of 60% silver and 40% gold, each grain in the alloy will be 60% silver and 40% gold. In metallurgical terms, it is a homogeneous solid solution. Gold and silver are mutually soluble and at any ratio will form a homogeneous solid solution. A homogeneous solid solution behaves like a pure metal, which means that its solidus and liquidus points have the same temperature value.
Silver and copper, however, have a completely different story. In an alloy of copper and silver, the interval between the points of solidus and liquidus can be measured in tens and hundreds of degrees. As an example, sterling silver becomes lustrous and begins to melt at 778°C but does not reach its liquidus point until 892°C. When cooled from liquid state it will not harden until it reaches a temperature of 778°C. This behavior of the metal is a consequence of the fact that in sterling silver the individual elements are unevenly distributed. Some grains in the alloy may have a composition of 94% Ag (silver) and 6% Cu (copper), some 94% Cu and 6% Ag, and all the remaining -72% Cu and 28% Ag.
The liquidus point of 72Cu/28Ag grains is 778°C, the liquidus point of 94Cu/6Ag grains is close to the melting point of pure copper, and the 6Cu/94Ag grains are brewed at a temperature slightly above 892°C. When the alloy is heated above 778°C, the 72Cu/28Ag grains will melt, but the 94Cu/6Ag and 6Cu/94Ag grains will still be in the solid state. The alloy will retain its shape, but will consist of a liquid contained in a solid crystalline matrix. In metallurgical terms, at the same temperature you have both liquid and solid phases. How liquid or solid it is depends on the temperature. As the temperature of the alloy increases, the silver dissolves more and more copper, and the hard grains dissolve. As soon as the temperature reaches 892°C, all grains will pass into the liquid phase.
Now we can talk about what happens to the mokume briquette when it is heated to the point where the surface begins to shine. At this temperature, the alloy contains grains that have reached the liquidus temperature and melted. If the conditions are met (cleaned metal surface, no oxides), then they will begin to flow or wet the surfaces of all plates. When fusible grains melt, they begin to flow out of the crystalline matrix and cover an ever larger area. They are affected by capillary attraction and fill the gaps between the plates and cover all exposed surfaces in the same way that silver solder behaves on a very clean area of \u200b\u200bmetal. They leave behind a porous matrix with more refractory grains. This porous area is a very weak spot in a laminate. To fix this, the briquette needs to be hammered lightly to compress this area as soon as it is taken out of the oven. This helps to give the porous area a denser, stronger structure. If this is not done, then the porous area will be a potential focus for delamination during subsequent processing.
In traditional fusion methods, determining the right moment to remove a briquette from a furnace or forge requires some skill and experience. Some combinations of metals are easy to work with, partly due to the wide range between the solidus and liquidus temperatures of one or more metals in the briquette. In an alloy with a wide melting range, the low temperature phase will melt and flow, creating a "shine", but the metal plates will still retain a solid structure of unmelted higher melting phases. If the melting range is narrow, then by the time you see the sparkle, the entire alloy has almost melted. It is also very difficult to fuse multi-layer briquettes because it is difficult to maintain uniform heating of the entire briquette. The outer edges may warm up to the appropriate temperature while the inner areas are still cold to fuse. In ancient Japan, there was no choice; you would work in a coal furnace and just overcome all the difficulties of this technique.
Today, temperature-controlled electric furnaces allow you to fully control the time and temperature of the fusion process. By controlling these two parameters, you can increase the success rate and work with large objects.
There is a major difference between traditional lamination and electric oven fusing. The metal is never heated to the liquidus temperature of any of its constituent phases of any of the metals used. Instead, the metal is heated to a temperature close to the liquidus temperature and held at that temperature for several hours. Now that you have an instrument that allows precise control, how do you choose the right temperature? To calculate it, we need to continue talking about metallurgy.
In metallurgical terms, the annealing temperature is also known as the recrystallization temperature. One of the processes that happens to a metal when it is heated to this temperature is the stress relief that has developed during cold machining, such as forging, rolling, or drawing. We are also interested in another aspect of this phenomenon. When a pure metal or alloy is heated to this temperature, crystals begin to grow in it again. If two or more clean, oxide-free metal plates are placed in close contact with each other and the temperature raised to just above the recrystallization point for the metals used, then crystals will grow across the boundary of their contact. The atoms of each metal will move by diffusion from one metal to another. In the process of movement, these atoms will assemble into ordered structures, which are determined by the relative size of the atoms and the number of each type of atom. The ordered structures of atoms are called grains. If the briquette is kept at this temperature long enough, it will turn into a homogeneous alloy of all metals in the briquette (this takes a lot of time). Typically, the area of diffusion in mokum is much smaller than 0.025 mm. The composition of grains in the diffusion region changes depending on how fast the atoms of each metal move relative to the atoms of other metals. It is the growth of new crystals at the point of contact of the metal plates that forms the connecting layer that connects them.
To determine the required temperature for laminating, you need to know some special daytime temperature of the lowest melting alloy of all the combinations of metals that are in contact with the surfaces. This does not mean the lowest melting point of the metal plate in the briquette. Let's take the lamas as an example, "a nation of copper and pure silver. We know that copper melts at 1083°C and pure silver at 960°C; but if you set your furnace to 926°C, you will find a puddle of molten metal when you return. It is to be understood that an alloy may melt at a lower temperature than the melting point of any of its constituent metals. In the case of silver and copper, the alloy with the lowest melting point is 28% silver and 72% copper; it melts at 778°C. This alloy is called eutectic. It is he who is the most fusible alloy of copper and silver and behaves like a pure metal. That is, it goes from solid state, into a liquid without an intermediate melting stage. Certain molecules of copper and silver will form just such an alloy that will melt if you bring these metals into close contact and heat them to 778°C. Metallurgists have many diagrams that show the melting points of combinations of two or more elements, called phase diagrams. Below is a ternary (three elements) phase diagram for gold, silver, and copper.
Phase diagrams for all combinations of metals can be found in reference books for metallurgists. They can also be found online. The phase diagram is the most accurate way to determine the temperature for lamination. Looking at the melting points of most known alloys, you can make an assumption that will not be far from the truth. For example, if you need the melting points of gold, silver, and copper alloys, you will see in the triple phase diagram that the minimum melting point is 778°C. Therefore, you can be sure that any combination of gold, silver and copper in an alloy will not melt below 778°C. Therefore, if you set the oven temperature to 760°C, you will find that gold/silver and copper alloys are successfully laminated without melting. I usually set the temperature to 15-30°C below the solidus temperature, in case the furnace heats up unevenly, or there are hot spots that can lead to local melting.
Equipment.
Most of the equipment needed to make mokume in an electric furnace is already available in a well-equipped jewelry shop, but you may not have some of the above.
Inexpensive oven with temperature sensor, suitable for mokume.
Bake:
The first thing you need is an electric oven with a thermostat that will allow you to set and maintain the exact temperature. Such furnaces can hold the temperature to within one degree Celsius. Gas ovens are not commonly used because they cannot be easily or inexpensively adjusted to maintain an accurate temperature.
There are three main parts in a digital temperature control system. The first is the thermostat itself. It is a special kind of microprocessor that uses a sensor to read the temperature inside the oven and sends a signal to an electronic switch that turns the heating elements of the oven on or off to maintain the desired temperature. The K-type thermocouple is the most commonly used sensor. He is with to a large extent reliability, can measure temperatures from room temperature to slightly above 1100°C. The switch can be either a relay or a semiconductor used to turn the heating elements on and off. You can get all of this for less than $300. It is also possible to modify an existing electric oven by installing a thermostat on it. Modification should not be carried out on your own if you are not familiar with the safety rules for installing electrical appliances. This should be done by a professional electrician.
Fan:
I use it to dry the metal after cleaning. It is important to dry the wet metal quickly so that it does not have time to oxidize when in contact with water. I use an inexpensive household vacuum cleaner, but exclusively for this purpose. The sleeve is attached to the outlet of the vacuum cleaner and is used to deliver a stream of clean, cool air under high pressure. You can also use a hair dryer by turning off the heat. If the air is supplied hot, it will speed up the oxidation process, so this is not necessary. Compressor air should not be used as it will contain small amounts of water and oil and will contaminate the metal.
Materials.
Pumice:
Pumice stone or household powder for cleaning copper or stainless steel surfaces, such as Clean King, is used to clean metal plates before laying them in the briquette.
Granular charcoal fraction 4-12 mesh.
This type of charcoal is used in aquarium filters, which you can purchase at your local pet store. It can also be purchased from companies that supply laboratory reagents, but at a higher price. high price. Ordinary charcoal for grilling can also be used, it must first be crushed into pieces about 6 mm in size, and this is a very messy process.
ScotchBrite abrasive sponges along with pumice are needed to clean metal.
Bolt-on clamping plates.
Two steel plates are needed to clamp the briquette that you are going to laminate between them with force. I usually use plates that are 20 - 25mm thick and have enough space to hold the briquette between the bolts.
Before each start of work, to remove oxides and notches after the previous briquette, I process their inner surfaces with an emery wheel. I can use them over and over until they get too thin. When their thickness is less than 20 mm, they bend strongly under the high temperature and pressure in the furnace, so they need to be replaced.
Nuts and bolts.
You will need nuts and bolts to hold the clamp plates together and hold them under pressure inside the oven. I found that 12mm bolts work well. The bolts must be at least 12mm longer than the thickness of the clamp plates and the briquette between them so that you have enough room to tighten the nut. You will also need two wrenches to tighten the nuts and bolts.
Protective covering.
A protective coating is applied to the clamping plates in order to prevent the briquette from fusing with the steel. Use yellow ocher diluted in water and some Elmers glue to make the paste adhere to the surface of the plates. You can also use Scalex, a protective coating for enameling copper surfaces, used to protect the back of the product from oxidation in the oven. Any of the methods will do.
Wrapping material for stainless steel tools.
This wrapping material is commonly used to make airtight bags to protect tool steel from oxidation during heat treatment during the air hardening process. It creates an excellent oxygen barrier during mokume lamination. The clamping plates with the briquette will be placed in a bag filled with charcoal, which will provide a reducing (oxygen-free) atmosphere.
The wrapping material is a specially formulated stainless steel foil that withstands the high temperatures in the oven and remains sealed. It is available in rolls 30 or 60 cm wide and 15 to 30 m long. It is sold from machine tool suppliers. Be very careful when working with this material. It is 0.05mm thick, about twice the thickness of a sheet of paper, so the foil can cut you like a knife.
preparatory operations.
Select and cut the metal sheets you are going to use in the laminate. The size and thickness of the sheets is determined by the size of the finished mokume product. I have worked with both small 25mm x 12mm inserts and large 75mm x 75mm inserts in thicknesses ranging from 26 B&S (0.4mm) to 6.3mm. If you do not plan to manually forge your briquette, then the thickness of your briquette should not exceed the maximum swath setting of your rolls. The swath spread of most manual rollers is limited to 6 mm or even less.
Granular charcoal is a very good absorbent, which is why it is used in filtration systems. It also absorbs water vapor from the air well. We do not need water vapor in a sealed bag in the oven, so we need to get rid of them. Pour 2 measuring cups (about 0.5 L) of granular charcoal into a metal saucepan and heat to just over 200°C (I use a flea market toaster oven for this) to evaporate any water that the charcoal has absorbed from air. This takes at least 30 minutes. Leave it in the oven heated to 200°C until you need it.
Now you need to clean and level the steel plates. The easiest way to do this is on an emery wheel, but you can do it manually. You need to remove all oxides and nicks from previous work from the inside surfaces of the steel plates. You don't need to do anything with the other surface. You should get a clean, smooth and flat surface. Once you've cleaned the steel plates, cover them with a thin coat of yellow ocher or Scalex and lay them in a warm place to dry.
Equipment for cleaning and shaping the briquette.
The next step is to clean the metals. Cleaning is undoubtedly the most important step in making mokume. If you do not carry out a thorough cleaning of the metal, then you will lose several hours of work, having received a poor-quality laminated briquette. It is very important to give close ownership of everything you do during this phase.
In my workshop, I use three small plastic tubs for cleaning. The first is filled with two liters of distilled water, this is a hard cleaning bath. The next bath is also filled with two liters of distilled water, this is the rinsing bath. The third bath is dry, next to it is a sprayer with distilled water. The tubs and sprayer were bought new and were only used to clean the mokume.
Work progress Step1.
Wash your hands with plain soap and water. Do not use perfumed soaps, lotions or moisturizing soaps as they will leave a film on your hands that will transfer to the metal being cleaned. Wash your hands well. Clean and rinse with copper bleach tweezers (I prefer fishtail tweezers), which I only use for cleaning mokume
Step 2
Take the metal plate in your hands and dip it into the cleaning bath. Sprinkle it with pumice stone and rub with an 8 cm piece of ScotchBrite abrasive sponge until the surfaces are clean and shiny. Do not ignore the edges of the plates.
Step3.
Take the cleaned sheet with copper tweezers and rinse it first in the cleaning bath, then in the rinsing bath. Loosen the grip of the tweezers in the rinsing bath to make sure that any remaining pumice between the sponges has been washed out. As soon as you have taken up the metal with tweezers, do not touch it with your hands anymore.
Step4.
Loosely holding the plate over a heated bath, spray distilled water from a spray bottle onto it. Water should form a flat, even film on the metal surface. If you notice that the water rises around the edges or collects in drops, then there are contaminated areas on the metal. You need to go back and repeat.
steps 2 and 3. If the sheet is clean, do not allow it to come into contact with anything other than tweezers or other cleaned briquette plates.
Step5.
Dry the plates with a stream of air from a vacuum cleaner. Be careful not to blow the metal plate out of the tweezers with the airflow. You should also dry the metal between the jaws of the tweezers. You can practice with uncleaned plates first. If you still lost control (dropped out of your hands) over the cleaned plate, go back to step 2.
Step 6
Place the workpiece on the bottom clamp plate. Then move on to cleaning the next plate - step 2.
Step 7
When all the workpieces are cleaned and stacked, place the clamp plate on top with the protective layer down and tighten the bolts with two wrenches.
Step 8
Clamp the entire structure in a vise or hydraulic press if you have one and tighten the bolts again while the briquette is under pressure. Best results are obtained with equal pressure on all bolts. This is best done with an automatic wrench (with a dynamometer). Wrenches of this type make a click when a certain torque is reached. They are relatively expensive, so if possible, rent them somewhere to practice, and later buy them for yourself if you feel the need for them. When working with an automatic key, I set it to 90 foot pounds (12.45 kilogram-meters) Set the assembled briquette aside until you complete the next step.
Step9.
From the wrapping foil, make a bag in which you will place the charcoal and the briquette itself. To make it, use scissors to cut a piece of foil so that its length is 5 cm longer than the perimeter of the clamping plates (10 cm x 4 = 40 cm + 5 cm = 105 cm), and 30 cm wide. Fold the foil sheet in half, and double-fold the edges, then smooth them with the power of a polishing pad or roller. Shape the foil into a tube and check that the clamping plates can fit inside. It will be easier for you to smooth the edges of the foil and place the briquette in the oven if you make grooves in the tube to give it a rectangular or square shape that mimics the shape of the clamping plates. Then double-fold the bottom end of the tube to form a bag, and smooth it down with a leather mallet.
Step 10.
Take the charcoal out of the oven. Pour a small amount into the bottom of a foil bag. Place the clamp plates in a bag and add enough charcoal to cover the top plate, then double-fold the top end of the tube and smooth the seam with a mallet.
Step 11.
Using tongs and refractory gloves, place the bag with the briquette into the preheated oven and leave it there for 8-12 hours. In most cases, I laminate my gold and silver alloy briquettes at 760°C and my non-silver copper alloy briquettes at 816°C. (For more information on fusion temperatures, see the table on the next page).
Step 12
Turn off the oven. Remove the package with the briquette from the oven and cool it at room temperature. Open the package. Be careful when doing this, wear protective leather gloves, as the foil, now much tougher and more brittle than it used to be, can cut you very easily. Take out the briquette. Loosen the bolts and remove the block from the clamping plates.
Step 13
Using a jewelry jigsaw with a very rough file or a hacksaw, file off the edges of the briquette. I usually shoot between 1.5mm and 4.5mm depending on how carefully I cut and stacked the plates. It is very important to collect the briquette in such a way as to remove as little metal as possible. Sand the edges with sandpaper to shine the saw marks.
Step 14
Solder the edges of the briquette with the most refractory silver solder you can work with. This will help reduce the risk of delamination in the early stages of thinning the briquette. If the briquette contains an alloy containing silver and copper, this usually means that a medium-melting solder should be used. Since copper and silver form a eutectic alloy in some proportion, you cannot heat the briquette above 778°C, which is its melting point. It is very important to use a good flux and heat the briquette gently because you can easily burn the flux and this prevents the solder from spreading. For this type of high temperature soldering, Handy flux paste or any other hard soldering flux will do. Be aware that Handy flux or other soldering fluxes contain fluorides and you need good ventilation for protection.
If the flux starts to burn out before you reach the required temperature, you can add more flux in the form of powdered borax. And you can buy it in the laundry departments of most supermarkets. Pour a pinch of borax on hot metal, it will protect it from oxidation. This will not work if the metal is cold as borax tends to bubble and flake off, but if the metal is heated to over 538°C the borax will melt and spread over the surface, coating it and creating a long lasting protection. You can add as much borax as you need. It will create a dense coating that is difficult to remove, use a potion or other treatment, or boil the cake in the bleach.
Step 15
At the initial stage, the thickness of the briquette should be reduced very carefully. I usually use rollers for this. Before annealing, I reduce the thickness of the briquette by no more than half a millimeter. With each pass between the rolls, I reduce the thickness by one tenth of a millimeter. I gently roll the bar 3-5 times before moving on to more aggressive methods. Experience is required to determine the amount by which you can reduce the thickness of the briquette between annealings. I cannot give you this formula. Be conservative; it is better to anneal too often than to delaminate the briquette by creating excessive stress. During the mokume annealing process, the briquette cannot be hardened, because the stresses caused by rapid cooling are too strong for the mokume bonding layer. Tempering can delaminate the briquette if the laminate is not of very high quality. To cool the briquette faster, I use a high-pressure fan blowing air. It is important to cool the metal quickly to reduce precipitation hardening. Some alloys harden when held at temperatures slightly below the annealing point. This is called particle hardening, or solution quenching.
Correspondence of temperature and time of fusion.
for making mokume in an electric furnace
Alloys Temp., °С Time, hour
1. Colored gold among themselves 760 8-10
2. Silver with copper,
nickel silver, bronze, kuromido or shakudo 738 8-10
3. Copper alloys among themselves 816 8-10
4. Gold with silver 760 8-10
5. Silver with brass 704 6-8
6. Platinum with 18k green gold (18K) 968 5-7
7. Palladium with silver 774 4-6
The above temperature/time relationship should be used as a general guideline for making mokume in an electric oven. Some alloys and types of furnaces require different times and temperatures. Steve Midgett
The art of joining metals. JEWERLY GARDEN. №5 2015 pp. 43-47.
“... Mokume gane, as a technology, originated quite a long time ago in the culture of feudal Japan. The name itself can be read as “metal with wood texture”, where “gane” is metal, “kume” is texture, “mo” is wood.
Mokume gane was invented by sword maker Denbei Shoami, 1651-1728, who spent most of his life working in Akita Prefecture, Northern Japan. He was the master
the highest level and in the manufacture of blades discovered that it is also possible to connect non-ferrous metals with each other, receiving
textures similar to patterned Damascus steel. The complexity of the technique invented by him lies in the fact that different metals, practically incompatible, are interconnected in very beautiful and bizarre patterns that never repeat.
Mokume gane is not only a technique, but also a kind of philosophy, because looking at the drawings created by melting metals, one can philosophize and contemplate, however, as in all oriental arts, where weapons and rings have always had a sacred meaning and proper names. The main thing in mokume gane is the creation of a drawing.
This is the most difficult process, and it consists in extracting inner layers on the surface of the product using various methods. Due to the multi-layered metal composite, the jeweler has ample opportunities to create various patterns. Metals are sintered by pressure
at high temperature, forming a diffusion substitution of atoms of different metals at the point of their connection. The whole process is very costly and time-consuming, requiring high jewelry skill.
The history of the discovery of this technique in the West was developed at the end of the 19th century in the 70-80s, when Hiroko Sato Pizhanovsky and Eugene Michael Pizhanovsky visited an exhibition of folk crafts in Tokyo. The works made in the mokume gane technique became a discovery for them and they made every effort to establish friendly relations with the master Gyukomei Shindo, as well as Masahisa Yagihara and Norio Tamagawa. From them they learned about the origin of technology. Another Japanese master named Hirotoshi Ito taught the mokume gane technique in 1998. Ito's lessons and philosophy left a deep imprint on the life and work of his students. And the mokume technique is still being introduced at the University of Tokyo. Fine Arts and Music.
At present, the mokume gane technique is one of the most complex and beautiful metalworking techniques. Mokume gane is the unity of technology and art, it requires from the master not only the deepest knowledge of production methods, but also creative inspiration. Unfortunately, the traditional Japanese technique of mokume gane is practically not used in Russia. The jewelers of St. Petersburg were able to recreate it, collecting information bit by bit and making some changes to the process, leaving the very essence of the products in this technique unchanged. Thanks to them, it became possible to create products with unique charisma in the synthesis of various metals, which manifest in their appearance the ancient technology of the masters of feudal Japan. Enjoy the uniqueness of mokume gane. She deserves to be admired.
The art of joining metals. JEWERLY GARDEN. №5 2015 pp. 43-47.


